dessert

Mini rainbow cashew cheesecakes

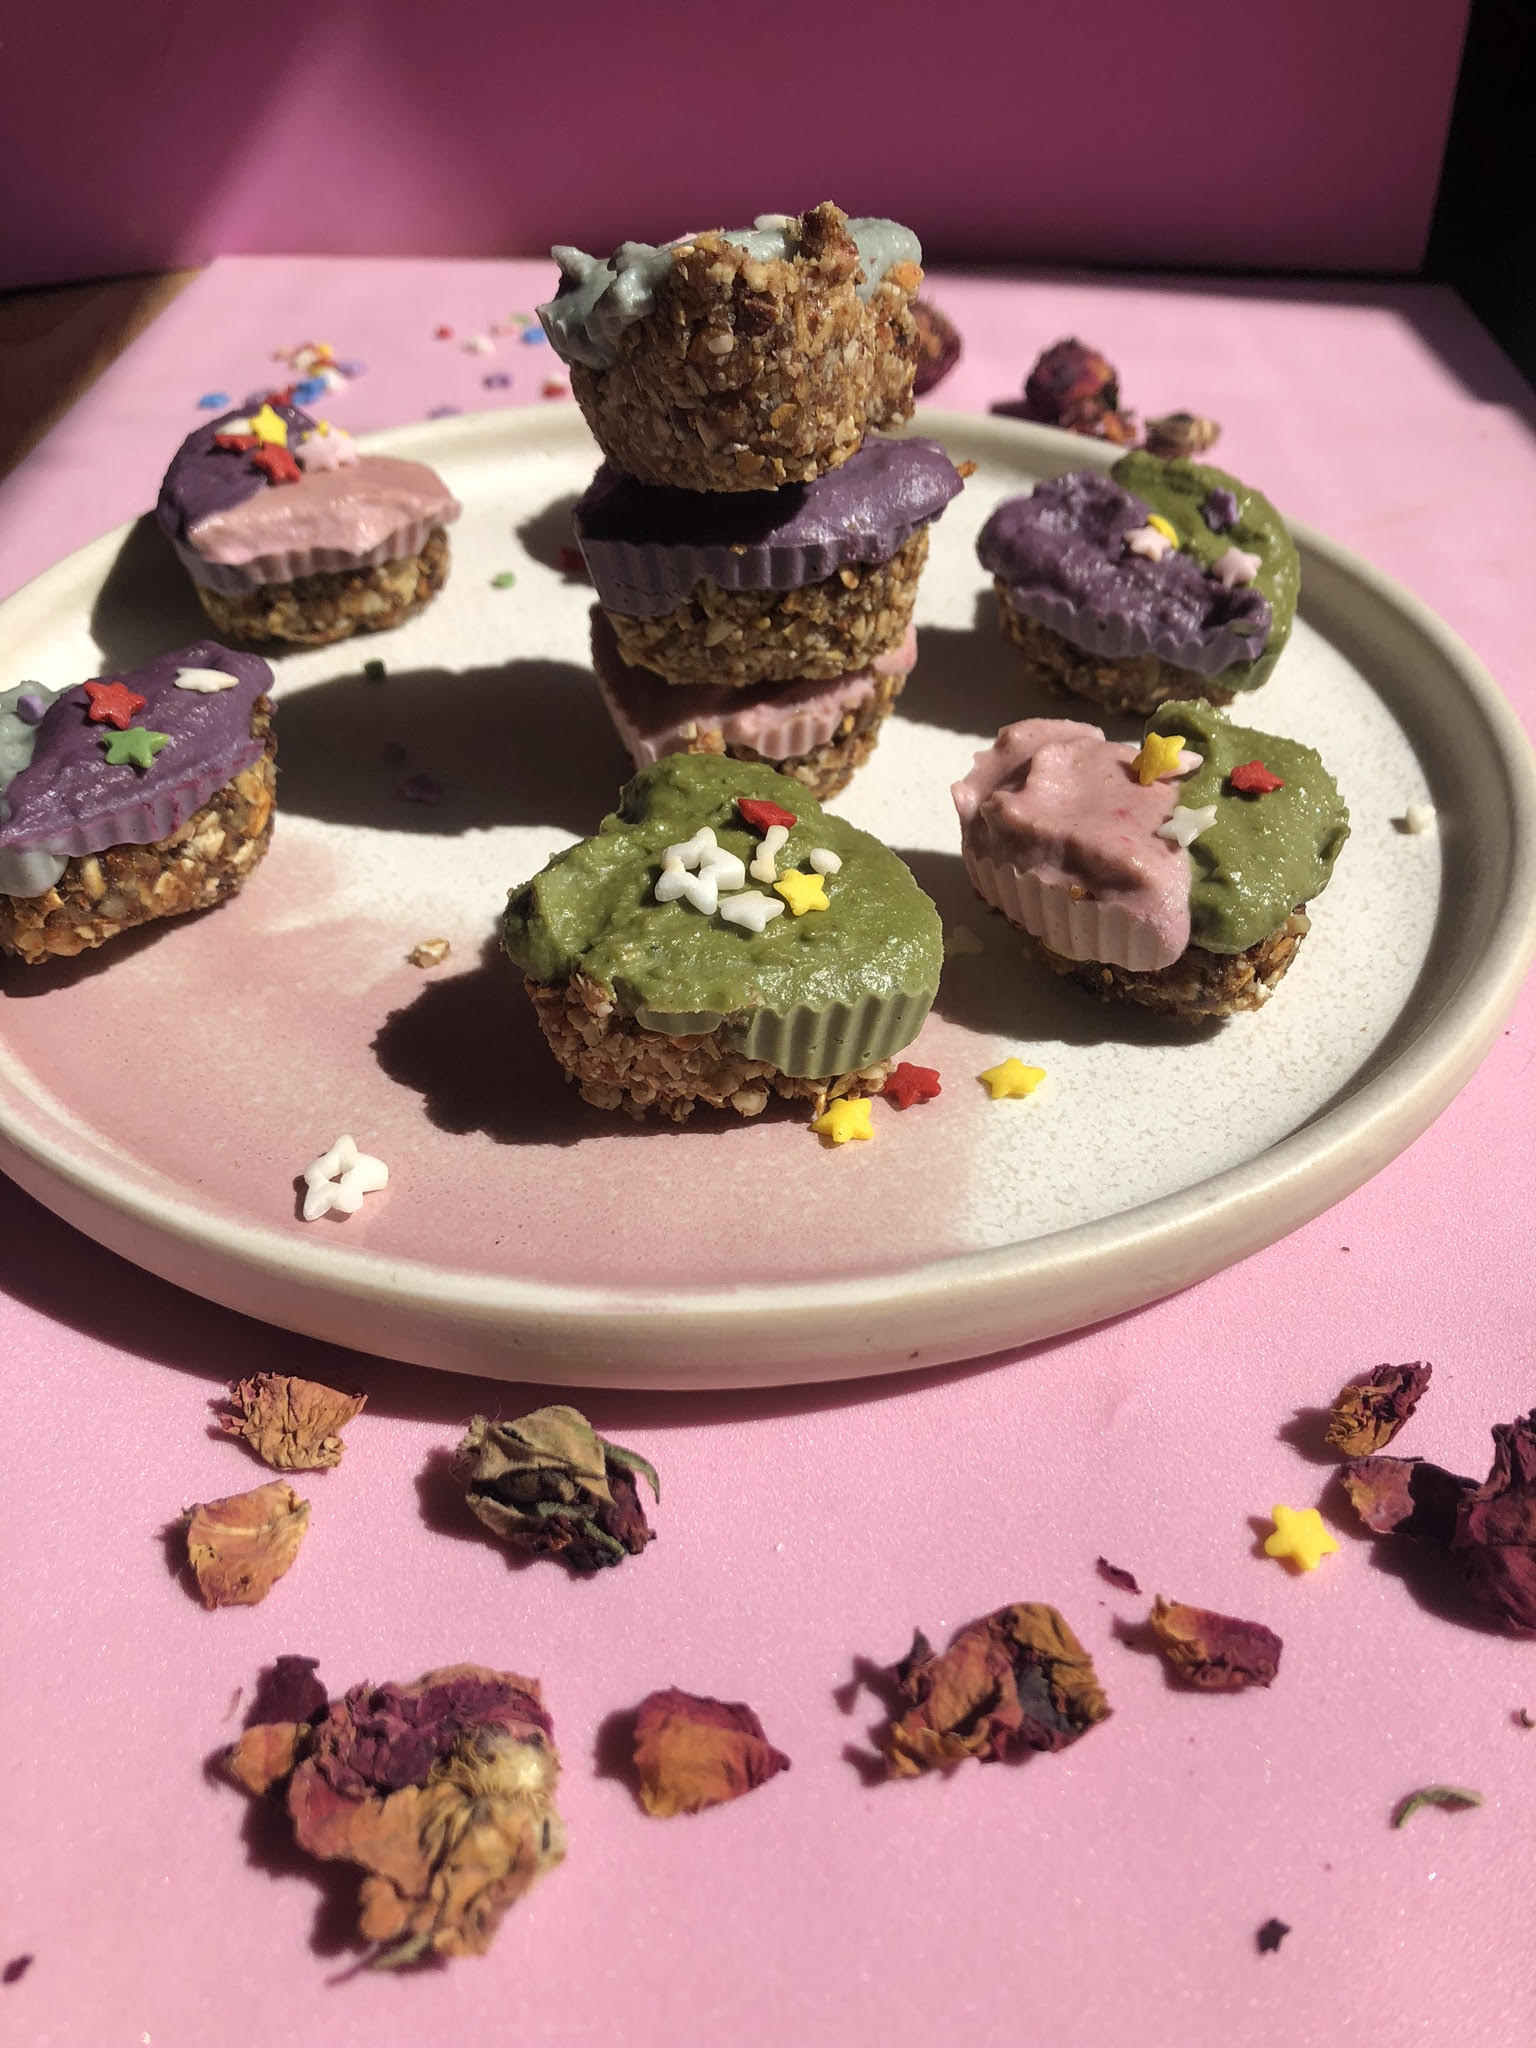
Spring is in the air (literally) and I am back to working with with the vibrant colors of SuperNaturals plant based food dyes. They use food and plants to create beautiful colors which the kiddos can’t get enough of. Not a sponsored post, just a brand I stand by. They are sold on Amazon and in NYC Whole Foods.

Recipe for mini rainbow cashew (some matcha) cheesecakes

Serving 10

Prep time 20 mins

Freeze time 20 mins

Ingredients

Base Layer:

  • 1 cup gluten free oats, dry toasted

  • 1/4 cup raw pecans

  • 1/4 cup raw almonds

  • 1 cup pitted and soaked dates (soaked in water to soften)

  • 1/4 cup melted coconut oil

  • 1 teaspoon cinnamon

  • 1 teaspoon salt

Cheesecake layer

  • 1 cup cashews ( I can be soaked in water overnight for easier digestion and better blending)

  • 1/2 cup unsweetened coconut cream

  • 1/4 cup melted coconut oil

  • 3 dated, pitted and soaked

  • 1 tablespoon lemon juice

  • pinch of salt

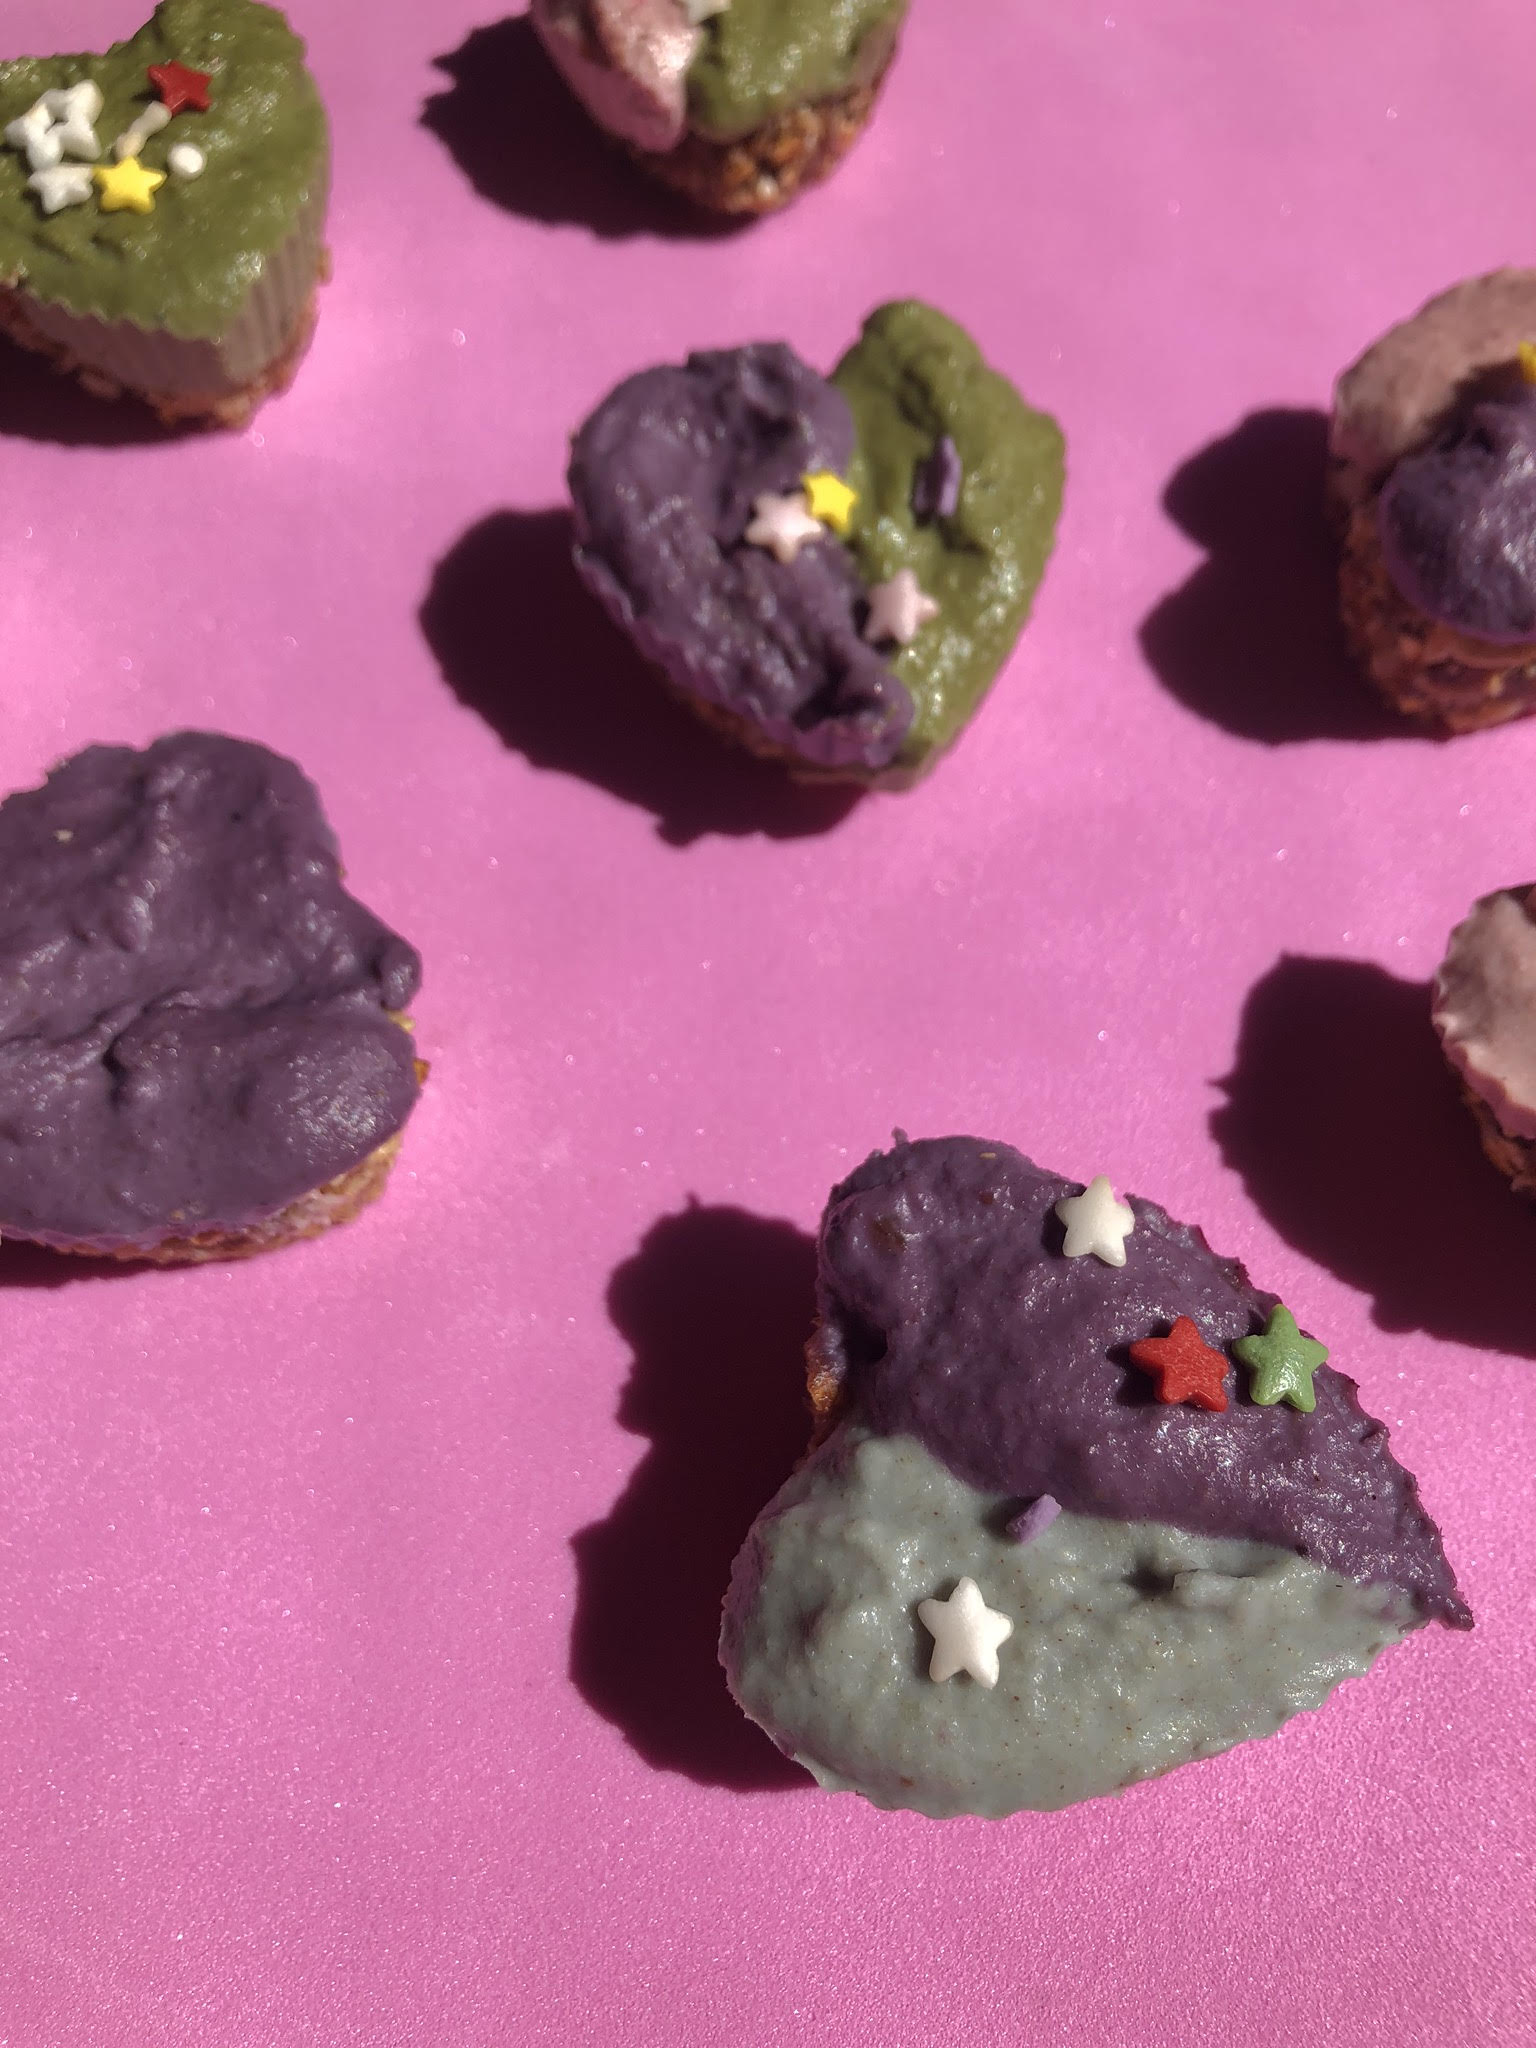
  • natural food dye, like SuperNatural Brand, can also use turmeric for yellow, we used matcha for green, beet powder for pink.

  • Sprinkles optional (I used SuperNatural brand)

Directions

  1. To make base layer, blend all ingredients together in a food processor or high speed blender. When the mix resembles a ball or clumps spoon into a mini muffin pan or small silicon mold and fill up half way (I used a heart shaped mold).

  2. Set in the freezer to take shape while you bake the base.

  3. Mix all ingredients together for the base except the food dyes in a food processor. Let the food processor run for about 5 mins until the cheesecake mix is smooth and creamy. You may need to add more coconut cream.

  4. Divide mix into for small mixing bowls and add food dyes.

  5. Once you have your desired colors, place cheesecake layer on top of base and let freeze for about 20 mins.

  6. Top with sprinkles and serve!

    **These treats to do need to kept either frozen or in the fridge. They will melt at room temp.

Super Powered Banana Bread

Inspired by Alison Wu's beautiful banana bread that she made with Simple Mills gluten and grain free banana bread mix, we decided we needed to make our own TTK version! Instead of using the store-bought mix, we created our own flour blend with flax seeds. Flax is so good for the body in many ways (hence the "super power" of this bread), but it specifically helps with boosting the immune system and decreasing risk of eye disease. 

This bread is healthy enough to eat for breakfast, but delicious enough to serve as a decadent dessert. It is also an easy preparation process, so as always, your little ones can get involved in most of the steps! Once the banana bread is baked and cooled, we recommend topping it with banana "nice cream" and some in-season fruits for an extra yum factor! We topped ours with nice cream, honey, peach slices, crushed pistachio, and dried rose petals. 


Super Powered Banana Bread

  • Prep time: 15 mins
  • Cook time 30 mins
  • Serves 8-10

Ingredients

  • ¾ cup almond flour
  • ¼ cup coconut flour
  • 1 teaspoon baking powder
  • ½ teaspoon baking soda
  • 1 tablespoon arrowroot powder
  • 1 teaspoon chia seeds
  • 1 teaspoon flax seeds
  • ¼ cup coconut sugar
  • 1 teaspoon cinnamon
  • Pinch of sea salt

Wet ingredients

  • 2 eggs
  • 2 very ripe bananas
  • 1 teaspoon vanilla
  • 3 tablespoons melted  coconut oil

Optional Toppings:

  • Honey
  • Chopped Pistachios
  • Sliced Peaches
  • Banana “Nice Cream”
  • Almond Butter
  • Jam

Directions

  1. Preheat oven to 350 degrees F.
  2. Grease an 8 x 4 baking loaf and set aside.
  3. Whisk eggs with coconut oil and vanilla. Mash bananas with a fork into the mixture.
  4. Add dry ingredients to same mixing bowl and stir to combine. Mixture should be slightly runny.
  5. Add mixture to baking loaf and bake on middle rack.
  6. Check after 30 minutes by sticking a toothpick in the the middle. If it comes out dry, the bread is done. If the toothpick comes out with batter, place back in oven for another 5-10 minutes, depending on oven.
  7. Enjoy plain or top with your favorite toppings!

Avocado Ice Cream (vegan)

Happy (belated) National Avocado Day!

The mini-chefs I worked with this week were eager to celebrate the holiday by eating a ton of creamy avocado, but they also wanted to beat the NYC summer heat with a yummy frozen dessert. We found the perfect solution with this vegan avocado-based ice cream.

To fully embrace the spirit of the holiday, we whipped up the avocado ice cream and then crafted this treat to look like it's original source. We saved the avocado shell, spooned the ice cream back into it, and created a chocolate coconut ball for the "pit." The end result was adorable and so satisfying. And, of course, these were so much fun to make! 

avocado ice cream-1.jpg

Avocado Ice Cream Recipe

  • Serves 4
  • Prep time: 10 mins 
  • Freeze Time: 3 hours

Ice Cream Ingredients: 

  • 2 avocados (reserve avocado skin for serving)
  • 1 tablespoon melted coconut oil
  • 1 tablespoon of fresh lime juice
  • ½ of a can of full fat coconut milk
  • 2 tablespoons of maple syrup
  • ½ teaspoon of salt

"Pit "Ingredients (Optional):

  • ¼ cup unsalted sunflower seeds
  • ¼ cup sunbutter
  • 1 tablespoon melted coconut oil
  • 2 tablespoon of maple syrup
  • 1 tablespoon unsweetened cocoa powder
  • Handful of mini chocolate chips

Directions:

Blend all ingredients together in a high speed blender and transfer to a loaf pan, wrapped in plastic. Freeze for an hour or up to 1 week. Let soften at room temperature 20 minutes before serving.

To make the pit: place all ingredients in a food processor and process until smooth. Scoop out with either a spoon or cookie scoop and roll into 2 inch balls.

When ice cream has set but hasn’t quite frozen spoon back into avocado skin and place the pit in the middle!